the backyard astronomer’s guide

Embark on a celestial journey! This guide unlocks the universe, offering accessible astronomy for all levels, from beginners to seasoned stargazers, using simple tools.

Getting Started with Naked-Eye Astronomy

Begin your astronomical adventure with just your eyes! No expensive equipment is needed to appreciate the beauty of the night sky. Start by finding a dark location, away from city lights, to maximize visibility. Allow your eyes at least 20-30 minutes to adjust to the darkness – this is crucial for seeing fainter objects.

Familiarize yourself with the brightest stars and constellations. Look for patterns and shapes, and use online resources or star charts to help identify them. Observing meteor showers, like the Leonids, is a fantastic naked-eye experience. Remember, patience is key; observing takes time and practice. Embrace the wonder and enjoy the universe unfolding above you!

Understanding Constellations

Constellations are patterns of stars, historically used for navigation and storytelling. They aren’t physically related groups, but appear close from our perspective on Earth. Learning constellations provides a framework for navigating the night sky and locating celestial objects.

Think of them as connect-the-dots in the heavens! Start with prominent constellations like Orion, Ursa Major, and Ursa Minor. Utilize star charts and astronomy apps to aid identification. Understanding how constellations shift with the seasons will deepen your knowledge. Recognizing these stellar groupings unlocks a deeper appreciation for the cosmos and its vastness.

Locating Major Constellations

Finding constellations begins with familiar landmarks. Use bright stars as starting points, then trace the patterns. Orion, visible in winter, is easily spotted by its three belt stars. Ursa Major, the Great Bear, contains the Big Dipper, a helpful guide to Polaris, the North Star.

Ursa Minor, the Little Bear, surrounds Polaris. Star charts and apps are invaluable tools for locating fainter constellations. Practice regularly, and you’ll quickly learn to recognize these celestial patterns. Remember that the sky changes throughout the night, so adjust your observations accordingly!

Orion: The Hunter

Orion is a dominant winter constellation, easily recognized by its distinctive hourglass shape. The bright stars Betelgeuse and Rigel mark Orion’s shoulders and feet, respectively. Three stars form Orion’s belt – Alnitak, Alnilam, and Mintaka – a prominent feature in the night sky.

Below the belt lies the Orion Nebula, a stellar nursery visible even with binoculars. Orion is rich in mythology and offers stunning views for backyard astronomers. Observing Orion provides a fantastic introduction to constellation identification and deep-sky objects.

Ursa Major & Minor: The Great & Little Bear

Ursa Major, the Great Bear, is famed for containing the Big Dipper asterism – a prominent pattern of seven bright stars. This constellation is circumpolar in many northern latitudes, meaning it’s visible year-round. Use the Big Dipper’s pointer stars to locate Polaris, the North Star.

Ursa Minor, the Little Bear, contains Polaris at the tip of its handle. While fainter than Ursa Major, it’s crucial for navigation. Both bears are steeped in mythology and offer excellent starting points for learning the night sky’s patterns.

Essential Tools for Backyard Astronomy

Begin your astronomical adventures with the right equipment! While the naked eye is a fantastic starting point, certain tools significantly enhance the experience. Star charts and astronomy apps are invaluable for identifying constellations, planets, and deep-sky objects, providing a roadmap to the cosmos.

A red flashlight is crucial; red light preserves your night vision, unlike white light. Beyond these, binoculars can reveal stunning details. These tools empower you to explore the universe from your backyard, fostering a deeper connection with the night sky.

Star Charts and Apps

Navigating the night sky becomes effortless with star charts and astronomy apps. Traditional charts offer a tangible connection to the constellations, teaching you to recognize patterns. Modern apps, however, provide interactive star maps that adjust to your location and time.

These digital tools often include features like planet identification, constellation lines, and even deep-sky object databases. They’re perfect for beginners, offering a user-friendly way to learn and explore. Both methods are excellent resources, complementing each other for a richer astronomical experience.

Red Flashlight

Preserve your night vision with a red flashlight – an essential tool for backyard astronomy! White light constricts your pupils, hindering your ability to see faint celestial objects. Red light has a minimal impact on your dark adaptation, allowing you to maintain optimal viewing conditions.

You can purchase dedicated red flashlights or easily create one by covering a standard flashlight with red cellophane. This simple addition dramatically improves your observing experience, enabling you to comfortably read star charts and adjust equipment without sacrificing your precious night vision.

Observing Meteor Showers

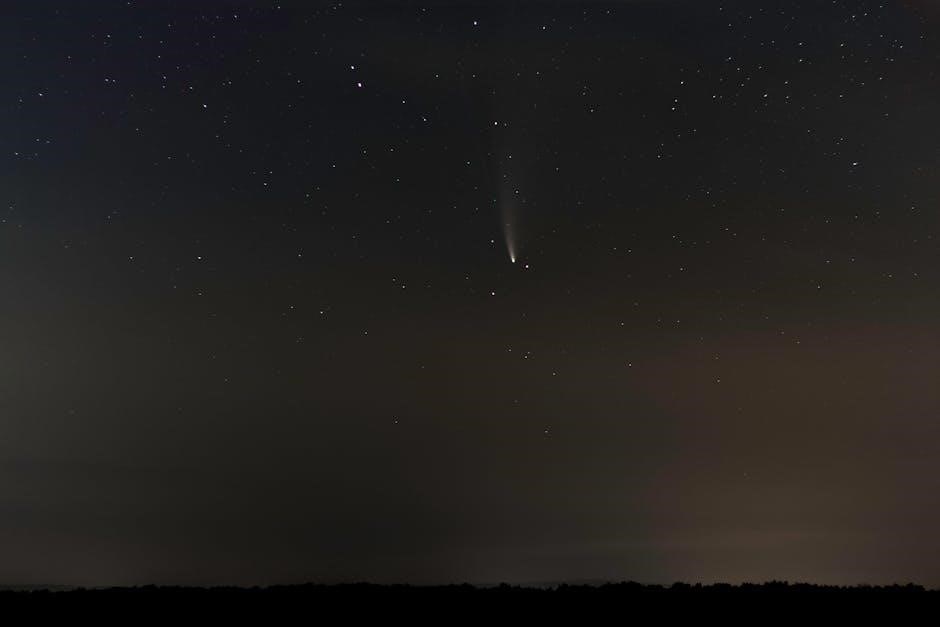
Meteor showers are spectacular celestial events, best viewed from dark locations away from city lights. No special equipment is needed – simply lie back and observe! These “shooting stars” occur when Earth passes through debris trails left by comets.

The Leonid meteor shower, peaking in November, is particularly renowned for its intensity. Patience is key; allow your eyes to adjust to the darkness for at least 20 minutes. Look towards the radiant point (the apparent origin of the meteors), but meteors will appear across the entire sky.

The Leonid Meteor Shower

The Leonid meteor shower, occurring each November, is famous for its dramatic displays. Originating from debris shed by comet Tempel-Tuttle, it can produce intense bursts of meteors, sometimes exceeding hundreds per hour during peak activity. Historically, the Leonids have been responsible for some of the most spectacular meteor storms ever witnessed.

While not every year guarantees a storm, observing during the peak nights offers a high chance of seeing numerous bright meteors streaking across the sky. Find a dark location, allow your eyes to adjust, and look towards the constellation Leo, the shower’s radiant point, for optimal viewing.

Understanding the Moon’s Phases

The Moon’s phases are a captivating celestial dance, resulting from its orbit around Earth and changing angles of sunlight reflection. From New Moon – invisible to us – it progresses through Waxing Crescent, First Quarter, Waxing Gibbous, Full Moon, Waning Gibbous, Last Quarter, and finally, Waning Crescent before repeating the cycle.

Understanding these phases enhances your observing experience. A Full Moon, while bright, washes out fainter objects. New Moon provides the darkest skies, ideal for deep-space viewing. Observing the terminator – the line between light and dark – reveals stunning lunar details due to long shadows.

Exploring the Solar System with the Naked Eye

Even without telescopes, our solar system reveals itself to keen observers! Venus and Jupiter are often the brightest “stars” in the evening or morning sky, easily visible. Mars appears as a reddish hue, while Mercury is trickier to spot, hugging the horizon. Saturn, though fainter, can be identified with practice.

While Uranus and Neptune remain beyond naked-eye visibility, observing the movements of these visible planets over weeks reveals their orbital paths. Remember to consult star charts or apps to pinpoint their locations and differentiate them from stars!

Identifying Planets Visible to the Naked Eye

Five planets are regularly visible without aid: Mercury, Venus, Mars, Jupiter, and Saturn. Venus shines brilliantly, often called the “morning star” or “evening star.” Jupiter is the brightest after Venus, appearing as a steady glow. Mars displays a distinctive reddish tint. Saturn appears yellowish, but is fainter.

Mercury is challenging, seen low on the horizon near sunrise or sunset. Planets don’t twinkle like stars; this steadiness is a key identifier. Use astronomy apps or charts to confirm your observations and learn their current positions in the night sky!

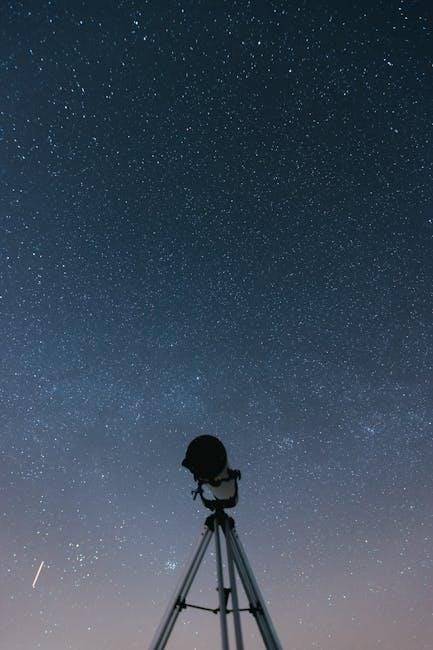
Stepping beyond naked-eye viewing, a telescope reveals incredible detail. Refractors use lenses, offering sharp images but can be pricier. Reflectors use mirrors, gathering more light for fainter objects, and are generally more affordable. Catadioptric telescopes combine both, providing versatility.

Aperture (lens/mirror size) is crucial – larger aperture gathers more light. Consider portability and ease of use. Don’t overspend initially; a smaller, well-made telescope is better than a large, complex one you won’t use. Research and read reviews before investing!

Choosing Your First Telescope

Beginners often face a bewildering array of choices. Start with a modest aperture (60-80mm for refractors, 114-150mm for reflectors) to keep costs down. Avoid “department store” telescopes – they often sacrifice quality for price. Prioritize a stable mount; shaky views are frustrating.

Consider what you want to observe: planets benefit from higher magnification, while deep-sky objects need light-gathering ability. Research different telescope types and read online reviews. A good starting budget is between $200-$500. Don’t be afraid to ask experienced astronomers for advice!

Assembling and Operating a Telescope

Carefully unpack all components and refer to the manufacturer’s instructions; Tripod and Mount Assembly: Ensure a stable base, tightening all screws securely. Level the tripod for smooth movement. Telescope Tube Mounting: Gently attach the tube to the mount, balancing it properly.

Start with the lowest power eyepiece for easy focusing. Slowly adjust the focus knobs until the image is sharp. Practice during daylight to familiarize yourself with the controls. Remember to collimate (align the mirrors) for optimal performance, especially with reflectors.

Tripod and Mount Assembly

Begin by extending the tripod legs, ensuring they lock securely in place for a stable base. Leveling is crucial; use the built-in bubble level or a separate level to adjust leg height. Attach the equatorial or altazimuth mount to the tripod head, tightening all connecting bolts firmly.

Properly balanced mounts allow for smooth tracking of celestial objects. Familiarize yourself with the mount’s controls – slow-motion knobs for precise adjustments are essential. A sturdy assembly minimizes vibrations, leading to clearer views. Double-check all connections before mounting the telescope tube.

Telescope Tube Mounting

Carefully align the telescope tube with the mount’s dovetail plate or mounting rings. Gently slide the tube into position, ensuring a secure fit. Tighten the tube rings or dovetail clamp screws – avoid over-tightening, which can damage the tube.

Balance the telescope by adjusting the tube’s position within the rings or along the dovetail. Proper balance is vital for smooth movement and accurate tracking. Once balanced, double-check all connections before adding any accessories like eyepieces or finderscopes. A stable mount and securely attached tube are key to enjoyable observing.

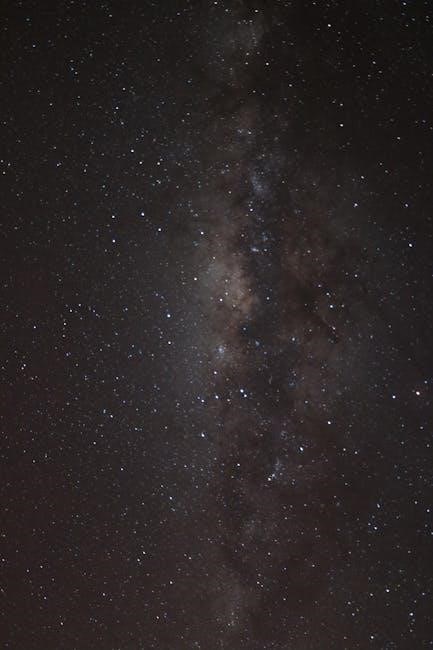
Deep Space Objects Visible with Binoculars

Beyond planets, binoculars reveal stunning deep-sky treasures! The Andromeda Galaxy (M31) appears as a faint smudge, while the Orion Nebula (M42) glows with ethereal beauty. Star clusters like the Pleiades (M45) sparkle brilliantly, offering a captivating view.

Globular clusters, ancient collections of stars, also become visible. Dark skies enhance these observations significantly. Using a stable mount or resting your elbows can improve image stability. Explore these celestial wonders – binoculars are a fantastic stepping stone to deeper astronomical exploration!

Light Pollution and Finding Dark Skies

City lights hinder astronomical viewing, washing out faint objects. Light pollution significantly reduces the number of stars visible. Seek darker locations away from urban areas for optimal observing. Websites and apps, like Dark Site Finder, map light pollution levels, helping you locate ideal spots.

Consider driving to rural areas or utilizing local astronomy clubs’ observing sites. Even a slight reduction in light pollution dramatically improves visibility. Adapting to darkness takes time; allow your eyes 20-30 minutes to adjust fully for the best experience.

Resources for Further Learning

Expand your knowledge with excellent astronomy guidebooks, such as “Stars: A Guide to the Constellations,” a classic for beginners. Explore online astronomy communities and forums to connect with fellow enthusiasts and ask questions. Websites like Space.com and Sky & Telescope offer current news and observing tips.

Numerous YouTube channels provide visual guides and tutorials. Local astronomy clubs often host workshops and star parties, offering hands-on learning experiences. Don’t hesitate to utilize these resources to deepen your understanding and enjoyment of the night sky!

Astronomy Guidebooks

Begin your literary exploration with essential astronomy guidebooks! “Stars: A Guide to the Constellations” remains a timeless resource, perfect for learning constellations and navigating the night sky. Consider “Turn Left at Orion” for detailed observing projects using binoculars or a small telescope.

For a comprehensive overview, explore “National Audubon Society Pocket Guide to Constellations.” These books provide star charts, descriptions, and fascinating facts, enhancing your backyard observing sessions. They are invaluable tools for both novice and experienced astronomers seeking deeper understanding.

Online Astronomy Communities

Connect with fellow stargazers through vibrant online astronomy communities! Numerous forums and websites offer a wealth of knowledge, observing tips, and astrophotography inspiration. Cloudynights is a popular forum for telescope discussions and observing reports.

Reddit’s r/astronomy provides a diverse platform for questions, news, and sharing experiences. Websites like Space.com and Sky & Telescope offer articles, videos, and event calendars. These online resources foster learning, collaboration, and a shared passion for the cosmos, enriching your backyard astronomy journey.

Astronomy Day Celebrations

Mark your calendars for Astronomy Day! Celebrated annually, typically around late April, this event encourages astronomical outreach and public engagement. Local astronomy clubs often host star parties, telescope viewings, and educational workshops.

It’s a fantastic opportunity to connect with experienced astronomers, learn about the night sky, and share your passion with others. Many events are free and open to the public, making astronomy accessible to everyone. Check local listings and astronomy club websites to find celebrations near you and join the cosmic fun!

Pocket Sky Atlas: A Beginner’s Guide

Navigate the cosmos with ease! The Pocket Sky Atlas is an invaluable resource for budding astronomers, specifically designed for naked-eye observation and small telescope use. Its compact size makes it perfect for backyard stargazing sessions.

The atlas features detailed star charts, clearly illustrating constellations, deep-sky objects, and celestial coordinates. Understanding its layout and chart arrangement is key to successful navigation. It’s a practical tool for locating objects and expanding your knowledge of the night sky, offering a structured approach to learning.

motorbike helmet size guide

Yamaha’s R9 arrival in 2025 signals a rebirth of sportbikes, demanding a focus on proper fit. Selecting the correct helmet size is paramount for rider safety and comfort.

Why Proper Helmet Fit is Crucial

A correctly fitted motorbike helmet is the single most important piece of safety gear a rider can possess. Beyond legal requirements, a secure fit directly impacts the helmet’s ability to protect during an impact. Loose helmets can shift, compromising protection, while overly tight helmets cause discomfort and distraction.

Recent motorcycle developments, like the Yamaha R9’s 2025 release, emphasize performance, but safety remains paramount. A proper fit ensures the energy from an impact is distributed effectively across the helmet’s structure, minimizing head injury. Prioritizing fit isn’t merely about comfort; it’s about survival.

Understanding Helmet Safety Standards (DOT, ECE, Snell)

Motorbike helmet safety is regulated by various standards, ensuring a minimum level of protection. The Department of Transportation (DOT) standard is federally required in the US, focusing on impact absorption. However, the Economic Commission for Europe (ECE) 22.06 standard is widely considered more rigorous, with broader testing parameters.

Snell Foundation certification represents a private, non-profit standard, often exceeding both DOT and ECE requirements. While the 2025 QJ Motor lineup focuses on design, all helmets should meet at least DOT standards. Understanding these certifications helps riders choose a helmet offering optimal safety, regardless of brand or style.

Measuring Your Head for a Helmet

Ducati’s 2026 MotoGP presentation highlights precision – mirroring the need for accurate head measurements. A flexible tape measure is essential for determining your correct helmet size.

Tools You’ll Need (Flexible Measuring Tape)

QJ Motor’s expanding 2026 lineup emphasizes detail, just like accurate helmet sizing. The primary tool for determining your helmet size is a flexible measuring tape, similar to those used in tailoring. Avoid rigid measuring devices, as they won’t conform to the curves of your head. A soft, cloth or vinyl tape is ideal.

Ensure the tape measure is in millimeters or inches, depending on your preference and the sizing charts you’ll be using. A helper can be beneficial for accuracy, but you can also manage it yourself with a mirror. Precision is key; even small discrepancies can lead to an ill-fitting helmet, compromising safety and comfort.

Step-by-Step Head Circumference Measurement

Ducati’s 2026 MotoGP presentation highlights precision – mirroring helmet sizing. Begin by positioning the measuring tape approximately one inch (2.5 cm) above your eyebrows and ears. Wrap the tape horizontally around the largest part of your head, keeping it level. Don’t pull the tape too tightly; a snug, but comfortable fit is best.

Record the measurement in centimeters or inches. Repeat the process two or three times to ensure accuracy, taking the average of your measurements. This circumference is the foundation for determining your initial helmet size. Remember, brands vary, so this is a starting point, not a definitive size.

Measuring Forehead and Temple Width

QJ Motor’s expanding 2026 lineup emphasizes diverse rider needs – like varied head shapes. To complement circumference, measure forehead width. Place the tape from the widest point on your forehead, across to the other side. Next, measure temple width, from one temple to the other, just above your ears.

These measurements help determine helmet shape compatibility. A narrow forehead and wider temples suggest a round oval, while the opposite indicates a long oval. Knowing these dimensions refines your helmet selection, ensuring a secure and comfortable fit beyond just the circumference measurement.

Helmet Size Charts: A Comprehensive Guide

Ducati’s 2026 MotoGP presentation highlights precision – mirroring helmet sizing. Charts convert head circumference into standard sizes, but brand variations exist; always consult specific guides.

Converting Head Circumference to Helmet Size (Metric & Imperial)

QJ Motor’s expanding 2026 lineup emphasizes diverse rider needs, just like helmet sizing. Converting head circumference is crucial; use a flexible tape measure. Metric measurements (centimeters) typically translate to Small (56-58cm), Medium (58-60cm), Large (60-62cm), and so on. Imperial measurements (inches) correlate similarly: Small (22-23 inches), Medium (23-24 inches), Large (24-25 inches). However, these are general guidelines. Always refer to the manufacturer’s specific size chart, as variations occur. Remember, a precise measurement is the foundation for a safe and comfortable fit, mirroring the detailed preparation seen in motorsport events.

Brand-Specific Size Variations

Ducati’s 2026 MotoGP presentation highlights meticulous detail, mirroring the importance of brand-specific helmet sizing. While general charts offer a starting point, significant variations exist between manufacturers. A size Medium in one brand might fit like a Large in another. This stems from differing shell shapes and internal padding designs. Always consult the individual brand’s size chart – often found on their website or packaging. Continental’s recognition for mototourism underscores the need for comfort on long rides, achievable only with a properly fitted, brand-specific helmet.

Understanding Intermediate Sizes (e.g., XS, 3XL)

QJ Motor’s expanding 2026 lineup caters to diverse riders, necessitating a wider range of helmet sizes. Intermediate sizes, like XS, S, M, L, XL, 2XL, and 3XL, bridge the gaps between standard sizes. These are crucial for individuals whose head circumference falls between typical measurements. Don’t assume a standard size will suffice; an intermediate size may provide the precise fit needed. MV Agusta’s exclusive events emphasize personalization, and helmet fit is deeply personal. Always try on multiple sizes, including intermediates, to ensure optimal comfort and safety.

Helmet Types and Fit Considerations

Ducati’s 2026 MotoGP presentation highlights performance gear, including helmets. Fit varies by type – full-face, modular, open-face, or dual-sport – impacting comfort and protection.

Full-Face Helmet Fit

QJ Motor’s expanding 2026 lineup necessitates secure head protection. A full-face helmet should feel snug, encompassing the entire head. Cheek pads must contact firmly, without excessive pressure, ensuring minimal movement during impact. The forehead should be covered adequately, avoiding exposure. Perform the “roll-off” test: attempt to rotate the helmet side-to-side and front-to-back. If it moves easily, the strap needs tightening or a smaller size is required. Proper chin strap adjustment is crucial for stability, utilizing the double D-ring system for a secure closure. Comfort is key, but never compromise safety for a looser fit.

Modular/Flip-Up Helmet Fit

Ducati’s 2026 MotoGP presentation highlights the need for adaptable gear. Modular helmets, offering chin-bar lift, require a particularly secure fit. Ensure the locking mechanism clicks firmly into place, both in the closed and open positions. Like full-face helmets, cheek pads should provide snug contact; Pay attention to potential pressure points around the jawline when the chin bar is down. The roll-off test remains vital – minimal movement is essential. A properly adjusted chin strap, utilizing the double D-ring, is non-negotiable. Prioritize a fit that doesn’t compromise safety when the helmet is in either configuration.

Open-Face/3/4 Helmet Fit

QJ Motor’s expanding 2026 lineup showcases diverse riding styles, often suited to 3/4 helmets. These offer less coverage, making a precise fit even more critical. Ensure the helmet sits low on the forehead, providing adequate protection. Cheek pads should be snug, but not overly constricting. Verify the helmet doesn’t rock forward or backward during the roll-off test. Because of the exposed face, a secure chin strap is paramount; the double D-ring closure is essential. Consider wind resistance and potential noise levels when assessing comfort, as these helmets offer less wind protection.

Dual-Sport/Adventure Helmet Fit

Ducati’s 2026 MotoGP presentation highlights performance and rider connection, mirroring the needs of adventure riders. Dual-sport helmets require a secure, stable fit for varied terrain. Ensure ample room for goggles, and confirm they integrate seamlessly with the helmet’s visor. Cheek pads should provide firm support, minimizing movement during off-road riding. A snug fit is crucial to prevent lift at higher speeds. The chin strap must be securely fastened, utilizing the double D-ring system. Consider ventilation, as adventure riding can be physically demanding, requiring optimal airflow.

Checking the Helmet Fit

QJ Motor’s expanding 2026 lineup emphasizes rider experience, demanding a secure helmet. Perform the “roll-off” test; the helmet should not move independently from your head.

The “Roll-Off” Test

Ducati’s 2026 MotoGP presentation highlights precision, mirroring the importance of a secure helmet fit. The roll-off test is a crucial assessment. With the chin strap fastened, gently attempt to rotate the helmet back and forth, and then up and down. A properly fitted helmet should resist movement and stay firmly secured to your head. If the helmet shifts easily, it’s too loose and doesn’t offer adequate protection in a crash. This test verifies the snugness around your entire head, ensuring it won’t come off during impact. Repeat several times to confirm consistent security.

Cheek Pad Pressure and Comfort

QJ Motor’s expanding 2026 lineup emphasizes rider experience, much like a comfortable helmet. Cheek pads should firmly, but not painfully, press against your cheeks. This pressure is vital for preventing helmet rotation during an impact. You should feel even pressure across both cheeks. If the pads are too loose, the helmet is likely too large. Conversely, excessive pressure indicates a size too small. Comfort is key; prolonged discomfort suggests an improper fit. Ensure you can comfortably open and close your mouth and speak without significant restriction.

Ensuring Proper Forehead Coverage

Ducati’s 2026 MotoGP presentation highlights precision, mirroring the need for accurate helmet placement. The helmet should sit level on your head, covering your forehead adequately – approximately one to two finger-widths above your eyebrows. Insufficient coverage leaves your forehead vulnerable in a crash. Excessive coverage can obstruct your vision. Check for even contact across your forehead; gaps indicate a poor fit. A snug, secure fit is crucial. Remember, a properly positioned helmet maximizes protection and minimizes the risk of injury during a motorcycle accident.

Common Helmet Fit Problems and Solutions

QJ Motor’s expanding 2026 lineup reflects diverse rider needs, just like helmet fit. Addressing tightness, looseness, or pressure points ensures optimal comfort and safety.

Helmet Feels Too Tight

Ducati’s 2026 MotoGP presentation highlights precision – mirroring the need for a comfortable helmet. If your helmet feels excessively tight, it can cause headaches and discomfort during rides. First, ensure the strap isn’t overly cinched. Next, check if removable cheek pads offer adjustment options; removing a layer can create space. If tightness persists, especially around the temples or forehead, it likely indicates the helmet is too small. Do not continue riding a helmet that restricts blood flow or causes significant pain. Consider sizing up to the next available size and repeating the fit checks.

Helmet Feels Too Loose

QJ Motor’s expanding 2026 lineup emphasizes variety, yet a secure fit remains universal. A loose helmet compromises safety, potentially shifting during impact. Begin by tightening the chin strap – it should be snug, allowing only two fingers between the strap and your chin. If looseness persists, assess the cheek pads; thicker pads can fill gaps. If the helmet still moves easily on your head, it’s likely too large. Avoid attempting to compensate with padding alone. A properly fitted helmet should feel secure without causing pressure points; consider downsizing if necessary.

Pressure Points and Discomfort

Ducati’s 2026 MotoGP presentation highlights precision, mirroring the need for helmet comfort. Pressure points indicate an improper fit, often stemming from a shell shape mismatch with your head. Experiment with different helmet brands, as shapes (round, intermediate, long oval) vary. Removable cheek pads offer customization; try swapping them for different thicknesses. If discomfort persists, even after adjustments, the helmet may not be suitable; Prolonged pressure can cause headaches and distraction. Prioritize a helmet that feels comfortable from the start, avoiding the assumption that it will “break in.”

Helmet Shell Shape and Head Shape

QJ Motor’s expanding 2026 lineup emphasizes diverse designs, like heads! Matching your head shape (round, intermediate, long oval) to the helmet’s shell is crucial for a secure, comfortable fit.

Identifying Your Head Shape (Round Oval, Intermediate Oval, Long Oval)

Determining your head shape is vital for optimal helmet fit, beyond just circumference. Ducati’s 2026 MotoGP presentation highlights precision – apply that to your head! A Round Oval shape is widest at the sides. An Intermediate Oval is common, with a balanced width and length. A Long Oval shape is longer than it is wide, with the widest point extending towards the front and back.

To identify yours, use a flexible measuring tape. Measure the circumference around the widest part of your head, then from the brow line to the back. Comparing these measurements will reveal your dominant shape, guiding your helmet selection for a secure and comfortable experience.

Matching Helmet Shell Shape to Head Shape

Once you’ve identified your head shape, matching it to a helmet’s shell is crucial. Helmets aren’t one-size-fits-all; manufacturers design shells to accommodate different shapes. A QJ Motor’s expanding 2026 lineup demonstrates varied designs – helmets are similar! Round Oval heads benefit from rounder helmet shells. Intermediate Ovals suit most helmets, offering broader compatibility.

Long Oval heads require helmets specifically designed for that shape to avoid pressure points. Ignoring this can lead to discomfort and reduced safety. Trying on multiple brands and models is recommended, as shell shapes vary even within the same size. Prioritize comfort and a snug, secure fit.

Considerations for Different Riders

Ducati’s 2026 MotoGP presentation highlights individual needs; similarly, women, youth, and riders with glasses require specialized helmet fits for optimal safety and comfort.

Women’s Specific Helmet Sizing

QJ Motor’s expanding 2026 lineup reflects diverse needs, mirroring the importance of women’s specific helmet sizing. Traditionally, women have often been fitted into men’s helmet sizes, leading to suboptimal fit. Women generally have narrower head shapes and different facial structures. Consequently, dedicated women’s helmets feature a more tailored internal shape, particularly in the cheek pad and crown areas.

These helmets often offer smaller shell sizes, reducing bulk and weight. Prioritizing a proper fit ensures comfort, stability, and crucially, maximizes the helmet’s protective capabilities during a crash. Always measure head circumference and consider trying on helmets specifically designed for a woman’s head shape.

Youth and Child Helmet Sizing

Ducati’s 2026 MotoGP presentation highlights precision, a quality equally vital in youth and child helmet sizing. Children’s heads grow rapidly, necessitating frequent helmet checks. Never purchase a helmet “to grow into”; a loose helmet offers minimal protection. Youth helmets typically cover sizes for older children and teenagers, while child helmets are for younger riders.

Always measure head circumference and verify the helmet meets safety standards (DOT, ECE). Ensure a snug, but comfortable fit – the helmet shouldn’t move excessively. Prioritize helmets with adjustable retention systems and cheek pads for a customized fit. Replace helmets after any impact, even if damage isn’t visible.

Riders with Glasses

QJ Motor’s expanding 2026 lineup demonstrates inclusivity, a principle applicable to riders who wear glasses. Finding a helmet compatible with eyeglasses requires careful consideration. Look for helmets with recessed interior channels designed to accommodate spectacle arms, preventing pressure points and discomfort.

Ensure the helmet doesn’t push the glasses against the face, potentially causing discomfort or impacting vision. Some helmets feature dedicated eyewear channels or are specifically marketed as “glasses-friendly.” Prioritize a snug fit overall, even with glasses, and always test the helmet with your prescription eyewear before purchase.

Helmet Padding and Liner Adjustments

Ducati’s 2026 MotoGP presentation highlights customization, mirroring helmet liner adjustments. Removable cheek pads and liner thickness options allow for a personalized, secure fit.

Removable and Replaceable Cheek Pads

QJ Motor’s expanding 2026 lineup demonstrates a focus on detail, much like helmet cheek pads. Removable cheek pads are a crucial feature for achieving a snug and comfortable fit. They allow riders to fine-tune the helmet’s internal volume, addressing issues like looseness or excessive pressure.

Over time, cheek pads compress and lose their elasticity. Replacing worn pads restores the helmet’s protective capabilities and comfort levels. Different thicknesses are often available, enabling further customization. Regularly inspecting and replacing cheek pads ensures optimal performance and a secure fit, vital for safety during rides.

Liner Thickness and Customization

Ducati’s 2026 MotoGP presentation highlights meticulous adjustments, mirroring the importance of helmet liner customization. Helmet liners come in varying thicknesses, impacting fit and comfort. Riders can often swap liners to achieve a more precise fit, particularly those between standard sizes.

A thicker liner can tighten a slightly loose helmet, while a thinner liner provides more room. Some helmets feature customizable padding systems, allowing targeted adjustments for pressure points. Proper liner thickness ensures a secure fit, preventing helmet movement during impact. This customization contributes significantly to both safety and riding enjoyment.

Retaining Strap Adjustment and Security

QJ Motor’s expanding 2026 lineup emphasizes secure systems, like a helmet’s retaining strap. Proper chin strap tightness and the double D-ring closure are crucial for safety.

Proper Chin Strap Tightness

Ducati’s 2026 MotoGP presentation highlights precision, mirroring the importance of a correctly adjusted chin strap. It shouldn’t be so tight as to restrict breathing or cause discomfort, nor so loose that the helmet can shift during impact. A good rule of thumb is the “one-finger rule”: you should be able to comfortably slide one finger between the strap and your chin.

Ensure the strap lies flat against your skin, avoiding bunching or twisting. Regularly check the tightness, especially during longer rides, as straps can sometimes loosen with movement. A secure chin strap is a fundamental component of helmet safety, working in conjunction with a proper fit to protect you in the event of an accident.

Double D-Ring Closure System

QJ Motor’s expanding 2026 lineup emphasizes reliability, much like the dependable double D-ring closure. This system, considered the safest helmet closure, requires threading the strap through both rings and then back through itself. Ensure the tail end of the strap is securely tucked back into the keeper loop to prevent accidental opening.

Proper use is crucial; a loose or incorrectly fastened D-ring offers minimal protection. Practice fastening it correctly until it becomes second nature. The double D-ring provides a consistent and secure hold, far superior to quick-release buckles, making it the gold standard for helmet safety.

1 5 6 7